How to import Events, Contacts
and Tasks from a CSV file
Events, Contacts, and Tasks can be imported into MyOffice from a CSV file. The process for importing each data type is very similar, and so once you've got the hang of importing, for example, Tasks, then the other two CSV importable data types (other data types - for example, emails - are imported differently) will be very simple to import. For the purposes of this walk-through, we will be importing Tasks.
How to begin importing from a CSV
To begin importing from a CSV, open the main window associated with the type of data you wish to import - the Calendars for events, the Contacts window for Contacts, and the Tasks window for Tasks - then select "Import" and "CSV" from the "Tools" menu in that window. You will then be prompted for the name of the CSV file you wish to import from.
Mapping CSV columns to MyOffice fields
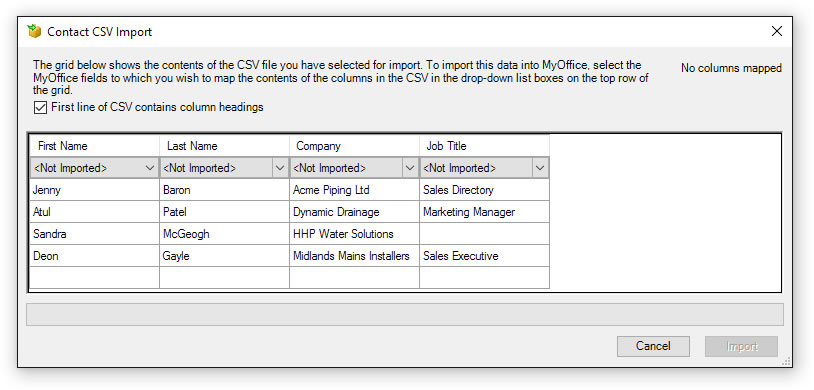
After selecting the CSV you wish to import, MyOffice will read the file, and attempt to parse it according to the generally accepted definition of a CSV. After parsing, your CSV will be displayed as a grid.

The CSV import dialog displays the data found in the CSV file in a grid format. The column headings are derived from the first line of the CSV if the "First line of CSV contains column headings" checkbox is checked, or are generated by MyOffice (Column 1, Column 2, etc.) if this checkbox is not checked. The data found in each column is displayed below headings, and all rows from the file are displayed. Showing the whole file allows you to scroll around and make sure MyOffice has managed to read your file correctly.
The first row of the list in the CSV Import dialog shows the MyOffice field into which the values in that column will be imported. If the column in question is to be ignored by the import, the combo box for the column in question will display "<not imported="">". If you wish to assign the values in a given column to either one of the built-in MyOffice fields, or to one of your user defined fields, select the desired destination field in the combo box in the column in question.
Once you are happy with your field mapping, press the "Import Button". MyOffice will now validate your import mappings, to make sure the data destined for each field is valid for that field.
Import Results
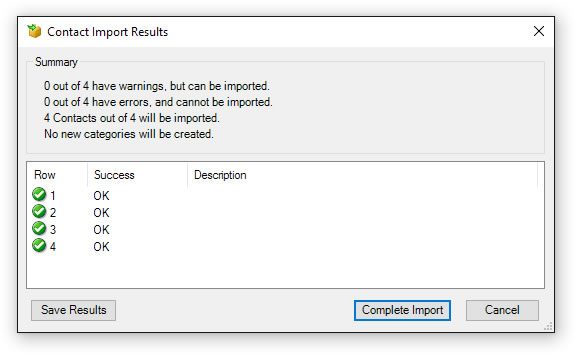
Once import validation is complete, the Import Results dialog will appear.

In the summary section, a series of counts will be displayed.
Rows which have warnings will be imported into MyOffice, but MyOffice has detected one or more minor problems with them - not sufficient to make them unimportable, but sufficient to mean they may require your attention. For example, you may be attempting to import more data into a text field than MyOffice will allow you to store.
Rows which have errors will not be imported into MyOffice, because there is a problem with the data for that row which means MyOffice can't create a valid item for that row. For example, attempting to import an event that has no start date and time will result in an error, for obvious reasons.
Rows which have neither errors nor warnings are imported exactly as per your mapping.
The list below the summary section shows the result for each row in the file. If you have errors or warnings, and wish to find out exactly what the problem was, double click on the row you wish to examine to show the Row Result dialog. This dialog will show you the result for the row as a whole, and also the result for each cell in that row, thereby allowing you to quickly work out why MyOffice is having trouble with that row.
If you are happy with the results of the import, click "Complete Import". You will now be prompted to select a destination Task List, Calendar or Contact group for the import. After selecting the destination for the import, the data will be added to MyOffice. This may take a little while if you are importing a large file.